입출력(IO)
- Input과 Output의 약자로 컴퓨터 내부 또는 외부 장치와 프로그램 간의 데이터를 주고 받는것
- 장치와 입출력을 위해서는 하드웨어 장치에 직접 접근이 필요한데 다양한 매체에 존재하는 데이터들을 사용하기 위해
입출력 데이터를 처리 할 공통적인 방법으로 스트림을 이용

스트림(Stream)
- 입출력 장치에서 데이터를 읽고 쓰기 위해서 자바에서 제공하는 클래스
- 모든 스트림은 단반향이며, 각각의 장치마다 연결할 수 있는 스트림 존재
- 하나의 스트림으로 입출력을 동시에 수행할 수 없으므로 동시에 수행하려면 2개의 스트림이 필요
1) 바이트 기반 스트림(1byte)
| 구분 | 입력스트림 | 출력스트림 |
최상위 클래스 |
InputStream | OutputStream |
하위 클래스 |
XXXInputStream | XXXOutputStream |
2) 문자 기반 스트림(2byte, 3byte)
| 구분 | 입력스트림 | 출력스트림 |
최상위 클래스 |
Reader | Writer |
하위 클래스 |
XXXReader | XXXWriter |
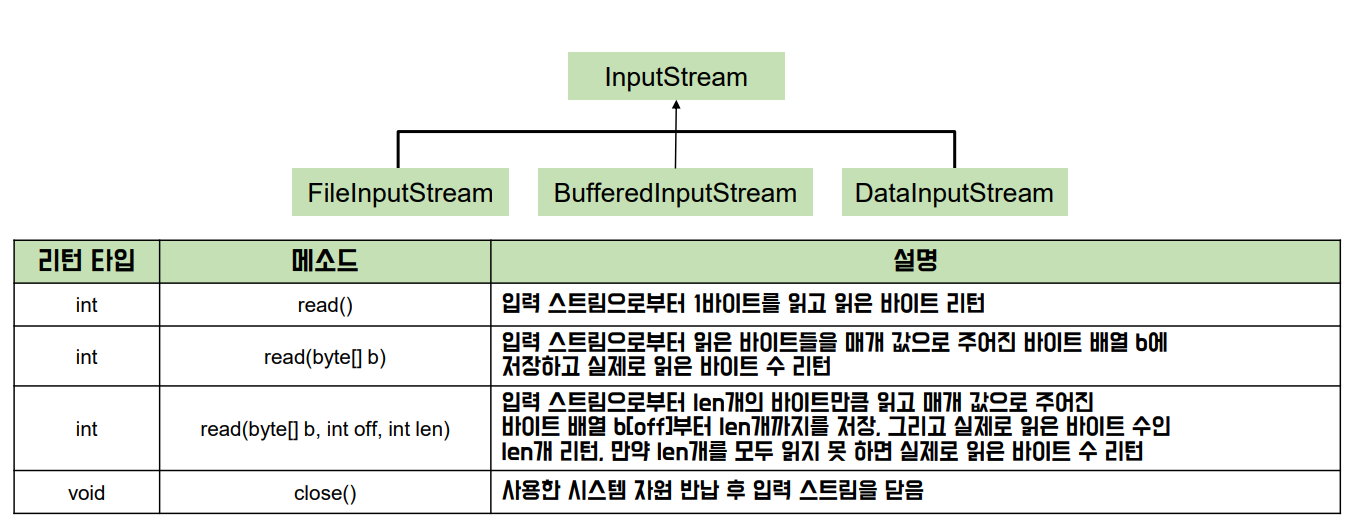
InputStream
: 바이트 기반 입력 스트림의 최상위 클래스로 추상 클래스
OutputStream
바이트 기반 출력 스트림의 최상위 클래스로 추상 클래스

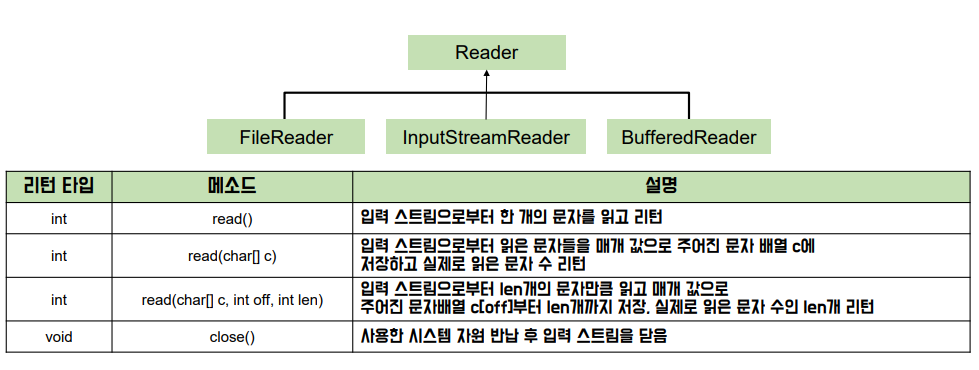
Reader
문자 기반 입력 스트림의 최상위 클래스로 추상 클래스
Writer
문자 기반 출력 스트림의 최상위 클래스로 추상 클래스

FileInputStream
- 파일로부터 바이트 단위로 읽을 때 사용
- 그림, 오디오, 텍스트, 비디오 등 모든 종류의 파일 읽기 가능
- InputStream의 하위 클래스로 inputStream의 메소드 사용 가능
FileInutStream 사용 예시
- 대상 파일이 존재하지 않는 경우 발생하는 FileNotFoundException에 대해 핸들링 해야함.- try-catch 블럭 처리
- 객체 생성 후 파일이 존재 하지 않으면 예외 발생
- 파일을 직접 생성한 후 다시 실행하면 예외가 발생하지 않음(스트림 객체가 정상적으로 생성 된 것)
- read() : 파일에 기록 된 값을 순차적으로 읽어오고 더 이상 읽어올 데이터가 없는 경우 -1 반환
- length() : 파일의 길이 반환
1) 1byte 단위로 읽어오기
한글은 한 글자에 3byte이기 때문에 1byte씩 읽어오면 글자가 깨져서 나옴
FileInputStream fin = null;

try{
    fin = new FileInputStream("src/com/greedy/section02/stream/testInputStream.txt");

    int value;

    while((value = fin.read)) != -1) {
    -1이 아닐때 까지 반복한다. 값이 1이라는건 파일에 저장된 기록이 아직 있다는 뜻

    System.out.println((char)value);
    기본적으로 정수로 읽어오기 때문에 문자로 출력하고 싶은 경우 형변환 한다.

   } catch (FileNotFoundException e) {
			e.printStackTrace();
   } catch (IOException e) {
			e.printStackTrace();
   }
}

-----------------------------------------------------------------------------------------

출력 결과
a
b
c
d
e
2) byte 배열을 이용하여 한 번에 데이터 읽어오기
byte 씩 읽어와야 하는 경우도 존재하기 하지만 대부분의 경우 비효율적이기 때문에 byte 배열을 이용하기
FileInputStream fin = null;

try{
       fin = new FileInputStream("src/com/greedy/section02/stream/testInputStream.txt");

   	   int value;

        (1) 읽어오고 싶은 파일의 길이를 알아오고,  파일 길이만큼 byte 배열 만들기
        int fileSize = (int) new File("src/com/greedy/section02/stream/testInputStream.txt").length();
        => length는 long 타입으로 반환 하기 때문에 int로 받으려면 형변환 필요
        byte[] bar = new byte[fileSize];

        (2) read()메소드의 인자로 생성한 byte 배열을 넣어주면 파일의 내용을 읽어서 byte 배열에 기록해 줌
        fin.read(bar);

        (3)for문으로 출력하기
        for(int i = 0; i < bar.length; i++) {
            System.out.println((char)bar[i]);
           }

   } catch (FileNotFoundException e) {
			e.printStackTrace();
   } catch (IOException e) {
			e.printStackTrace();
   } finally{
   		(4) fin 인스턴스가 null이 아닌 경우 자원 반납하는 finally구문 작성
        if(fin != null){
        	try {
            	 fin.close();
            } catch (IOException e){
            	e.printStackTrace();
            }
        }
   }
}
---------------------------------------------------------------------------------------------------

출력 결과
a
b
c
d
e
FileReader
- 텍스트 파일로부터 Byte 단위가 아닌 character 단위로 읽어 옴
- FileInputStream과 사용 방법 거의 동일
- Reader의 하위 클래스로 Reader의 메소드를 그대로 사용 가능
FileReader 사용 예시
FileReader fr = null;

try {

	  fr = new FileReader("src/com/greedy/section02/stream/testReader.txt");

      char 배열로 내용 읽어오기
      char[] carr = new char[(int) new File("src/com/greedy/section02/stream/testReader.txt").length()];
      => 읽어올 파일을 객체로 만들고, 그 파일의 길이 값을 배열의 길이 값으로 사용하여 문자 타입의 배열 생성

      fr.read(carr);

      for(int i = 0; i < carr.length; i++) {
				System.out.println(carr[i]);
			}

	} catch (FileNotFoundException e) {
			e.printStackTrace();
	} catch (IOException e) {
			e.printStackTrace();
	} finally {
		if(fr != null) {
			try {
				 fr.close();
			} catch (IOException e) {
				e.printStackTrace();
		}
	}
}
---------------------------------------------------------------------------------------

출력 결과
안
녕
하
세
요
FileOutputStream
- 파일로 byte단위로 출력할 때 사용, 모든 종류의 파일 출력 가능
- OutputStream의 하위 클래스로 OutputStream의 메소드를 그대로 사용 가능
FileOutputStream 사용 예시
- 출력 스트림의 경우 대상 파일이 존재하지 않으면 파일을 자동으로 생성함
- FileNotFoundException이 핸들링 하는 부분은 경로이기 때문에 존재하지 않는 경로까지 만들어주지는 않음
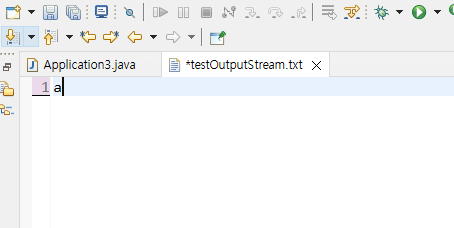
1) write() 메소드로 내보내기
FileOutputStream fos = null;

   try {

            fos = new FileOutputStream("src/com/greedy/section02/stream/testOutputStream.txt");

           (1)fos.write(97);


    } catch (FileNotFoundException e) {
            e.printStackTrace();
    } catch (IOException e) {
            e.printStackTrace();
    } finally {
         if(fos != null) {
             try {
                   fos.close();
            } catch (IOException e) {
                e.printStackTrace();
            }
        }
 }
파일 내용 확인
: 자동으로 파일이 생성 되고, 내보낸 97의 정수가 문자값으로 들어가 있음.
2) byte 배열을 이용해서 한 번에 기록하기 (10 : 개행문자)
FileOutputStream fos = null;

   try {

            fos = new FileOutputStream("src/com/greedy/section02/stream/testOutputStream.txt");

            (1)fos.write(97);

	    (2)byte[] bar = new byte[]{98, 99, 100, 101, 102, 10, 103, 104, 105};
	    fos.write(bar);


    } catch (FileNotFoundException e) {
            e.printStackTrace();
    } catch (IOException e) {
            e.printStackTrace();
    } finally {
         if(fos != null) {
             try {
                   fos.close();
            } catch (IOException e) {
                e.printStackTrace();
            }
        }
 }
파일 내용 확인
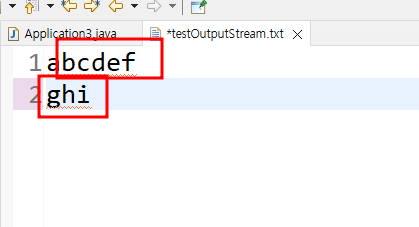
3) bar 배열의 1번 인덱스부터 3의 길이만큼 파일에 내보내기
FileOutputStream fos = null;

   try {

            fos = new FileOutputStream("src/com/greedy/section02/stream/testOutputStream.txt");

            (1) fos.write(97);

	    (2) byte[] bar = new byte[]{98, 99, 100, 101, 102, 10, 103, 104, 105};
	    fos.write(bar);

      	    (3)fos.write(bar, 1, 3);

    } catch (FileNotFoundException e) {
            e.printStackTrace();
    } catch (IOException e) {
            e.printStackTrace();
    } finally {
         if(fos != null) {
             try {
                   fos.close();
            } catch (IOException e) {
                e.printStackTrace();
            }
        }
 }
파일 내용 확인

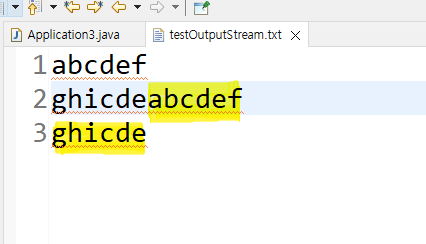
4) 기존 파일에 이어서 계속 추가 작성하는 방법
: 두 번째 인자로 true를 전달하면 이어쓰기 가능
전달하지 않으면 덮어쓰기가 됨(기본형태 or false 전달)
fos = new FileOutputStream("src/com/greedy/section02/stream/testOutputStream.txt", true);
파일 내용 확인
FileWriter
- 텍스트 파일에 character 단위로 출력
- FileOutputStream과 사용하는 방법이 거의 동일
- Writer의 하위 클래스로 Writer의 메소드를 그대로 사용 가능
- 동작하면서 중간 중간 내보내야하는 상황에는 flush()사용.
- 전부 쌓았다가 마지막에 내보내려면 finally구문에 close()사용
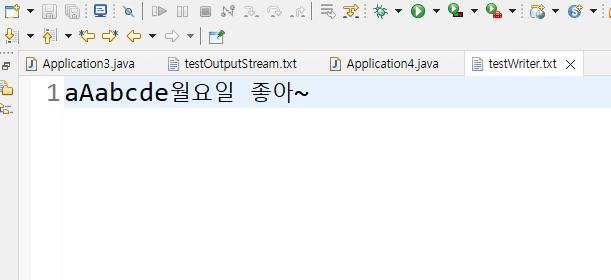
FileWriter 사용 예시
FileWriter fw = null;

try {

       fw = new FileWriter("src/com/greedy/section02/stream/testWriter.txt");

        (1) write()메소드 사용
        fw.write(97);

        (2) 직접 char 자료형으로 내보내기
        fw.write('A');

        (3) char 배열로 내보내기
        fw.write(new char[] {'a', 'b', 'c', 'd', 'e'});

        (4)문자열로 내보내기
        fw.write("월요일 좋아~");

     } catch (IOException e) {
		e.printStackTrace();
	 } finally {
		if(fw != null) {
			try {
				 fw.close();
			} catch (IOException e) {
				e.printStackTrace();
		    }
		}
	}
}
파일 내용 확인
'프로그래밍 > java' 카테고리의 다른 글
| [자바/Java] 입출력(io) / 보조스트림 / BufferredInputStream / DataInputStream / OutputStreamWriter / ObjectInputStream (0) | 2022.09.11 |
|---|---|
| [자바/Java] File 클래스 (0) | 2022.09.10 |
| [자바 /Java] Map 인터페이스 (HashMap / Properties) (0) | 2022.09.07 |
| [자바/Java] Set 인터페이스 ( HashSet, LinkedHashSet, TreeSet ) (1) | 2022.09.07 |
| [자바 / Java ] List 인터페이스 ( ArrayList , LinkedList, Stack, Queue ) (0) | 2022.09.04 |